Big Booty Exercises for a Bigger, Firmer Butt.
Share
What is the best exercise for big booty?
Booty Exercises for a Bigger, Firmer Butt.

7 Glute Exercises for a Bigger Butt
Ready to build that booty? Get ready to sculpt and tone your backside with these butt-boosting exercises. Whether you choose to incorporate them into a standalone workout or add them to your lower body or full-body routine, aim for at least 2 sessions per week to see the best results.
Take it slow at first, tackling just one set of each exercise. As you start to find your groove, gradually amp it up to two or three sets for an extra challenge. Let's turn up the burn and shape that peach!
Don't forget, consistency is key. Stick with it, and soon you'll be strutting with confidence, flaunting the results of your hard work. Get ready to unleash the power of your glutes! 💪🍑 #BootyGains #WorkoutMotivation
Safe for beginners, the glute bridge isolates and strengthens your glute muscles, hamstrings, and core while also improving stability in your hips.
Get ready to rock those glutes with this booty-blasting exercise! Here's a step-by-step guide to make sure you're nailing every rep:
-
Starting Position:
- Lie on your back with your knees bent and feet firmly planted on the floor.
- Place your arms at your sides, with your palms flat on the ground for stability.
-
Engage Your Core and Glutes:
- Tighten up those abs and contract your glute muscles. This is your power stance!
-
Lift Those Hips:
- Press your feet into the floor and start lifting your hips off the ground.
- Your body should form a straight line from your shoulders down to your knees.
-
Hold It:
- At the top of the movement, pause and squeeze those glutes for a solid 5 seconds.
- Feel the burn? That's the magic happening!
-
Lower with Control:
- Slowly and with control, lower your hips back down to the starting position.
-
Repeat and Rep It Out:
- Aim for 3 sets of 15 repetitions. You got this!
Remember, quality over quantity. Focus on perfecting each movement to maximize those gains. Now go ahead and crush those reps for a perkier, stronger booty! 🍑💪 #BootyBurn #FitnessGoals
This powerful plyometric exercise will boost your heart rate and help strengthen your glutes, hips, quads, hamstrings, and calves.
If you have any issues with your knees, ankles, and hips, or you struggle with balance, consult a physical therapist before trying jump squats.
Get ready to elevate your squat game with this explosive move! Here's a breakdown on how to master this exercise:
-
Take Your Stance:
- Stand tall in a squat position with your feet a bit wider than shoulder-width apart.
- Keep your arms relaxed at your sides, ready for action.
-
Get Low:
- Lower your body into a squat, making sure your thighs are parallel to your knees.
- As you squat down, bring your arms out in front of you, palms together for that extra engagement.
-
Power Up:
- Time to soar! Propel yourself up and off the ground.
- Aim to push your feet at least 3 inches off the ground – feel that burn!
-
Extend and Reach:
- Extend your arms forward to help with momentum as you take flight.
-
Soft Landing:
- Return to the squat position with soft, bent knees. Land gracefully, ready for the next takeoff.
-
Rinse and Repeat:
- Don't stop now! Squat back down and explode up again.
- Shoot for 3 sets of 10 to 15 repetitions. Quality reps over quantity!
Feel the power in those legs and embrace the burn. This explosive squat will have you reaching new heights in no time! 🚀💪 #SquatGoals #ExplosiveMoves
Walking lunges are an excellent exercise for building and toning the glute muscles while also targeting the quadriceps and improving your balance.
If you have any issues with your knees, ankles, and hips, consult a physical therapist before trying this move.
Time to tone those legs with a dynamic walking lunge! Follow these steps to nail the exercise:
-
Grab Your Dumbbells:
- Hold a dumbbell in each hand, arms hanging comfortably at your sides.
-
Stance Matters:
- Stand with your feet hip-distance apart, creating a solid base for the exercise.
-
Left Foot Forward:
- Step forward with your left foot, covering about 2 feet of ground.
-
Drop it Low:
- Bend your left knee towards the ground until it's parallel to the floor. This is your forward lunge position – feel that burn!
-
Hold the Pose:
- Pause and hold the lunge position for a few seconds. Engage those muscles!
-
Step It Up:
- Take a step forward with your right (back) leg, and now repeat the lunge leading with this leg.
-
Keep on Walking:
- Alternate legs and continue the walking lunge pattern for a total of 20 repetitions (10 for each leg).
-
Sets and Reps:
- Aim to complete 2 sets of 20 repetitions. It's the perfect balance of challenge and reward.
This walking lunge is a fantastic way to target multiple muscle groups and boost your lower body strength. Stride confidently towards those fitness goals! 🚶♀️🏋️♂️ #LegDay #LungeNation
Ready to take your lower body workout to the next level? The single-leg deadlift is here to challenge and sculpt your glutes and hamstrings while boosting your balance and core stability. Follow these steps to master this intermediate to advanced move:
-
Gear Up:
- Grab a dumbbell in each hand and position them in front of your thighs.
-
Take Your Stance:
- Stand with your weight predominantly on your right side, maintaining a slight bend in the knee for stability.
- Engage that core – it's your secret weapon for this exercise!
-
Initiate the Hinge:
- Start the movement by hinging at your hip. Allow the dumbbells to descend in front of you, keeping your palms facing each other.
-
Find Your Balance:
- As you hinge, extend your left leg straight back. Your torso will naturally lower towards the ground, and your right foot stays firmly planted.
-
Go Low and Slow:
- Hinge gradually until your left leg is parallel to the floor, or as close as you can manage while maintaining balance.
-
Lift Off Smoothly:
- Slowly return your left leg to the starting position. Control is the name of the game!
-
Repeat on the Other Leg:
- Switch sides and repeat the entire movement on your left leg.
-
Sets and Reps:
- Aim for 3 sets of 15 repetitions on each leg. Consistency is key to mastering this challenging yet rewarding exercise.
The single-leg deadlift is your ticket to a stronger, more sculpted lower body. Ready, set, hinge! 🏋️♀️🔥 #LegDayIntensity #BalanceChallenge
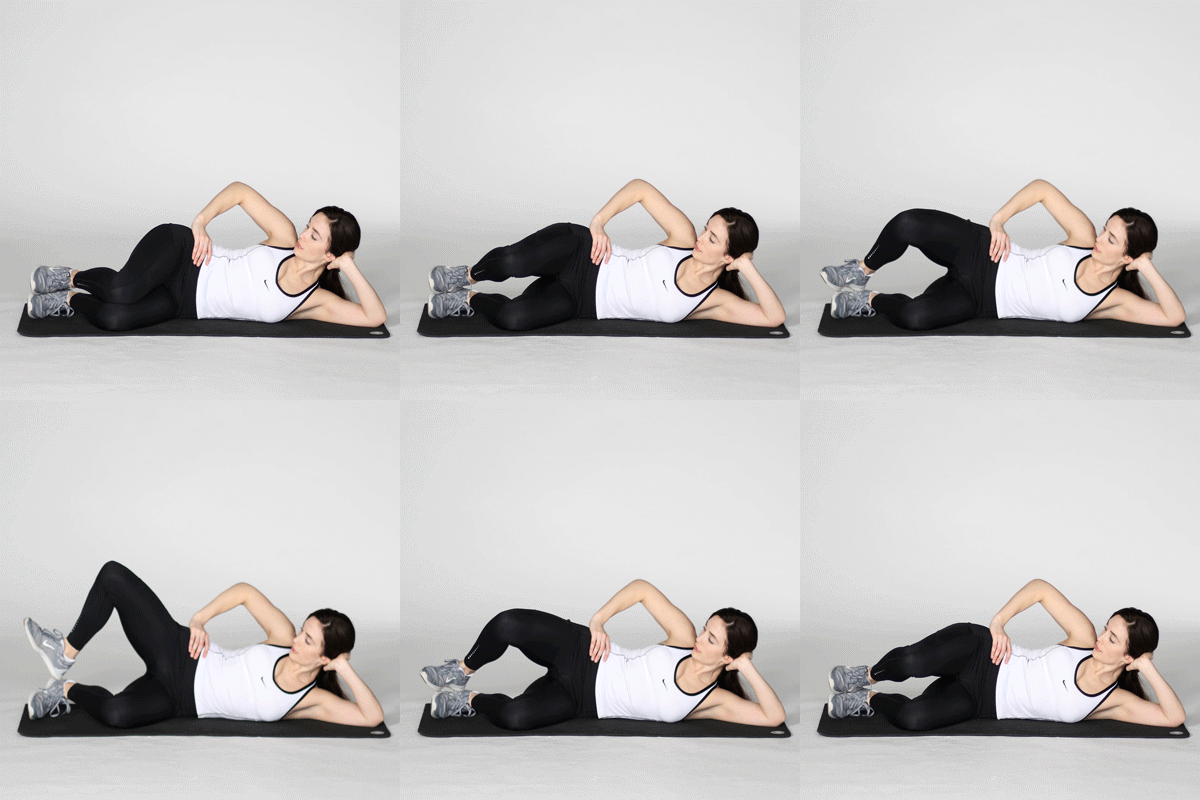
The clamshell targets the deep glute muscles (gluteus medius and minimus), which are often neglected when performing exercises like the squat and deadlift. Smaller than the gluteus maximus, these muscles help stabilize your pelvis, prevent lower back pain, and balance out your lower body.
Ready to fire up those hip muscles? Let's dive into the side-lying leg lift, a fantastic exercise to target your outer thighs and glutes. Follow these steps for a killer workout:
-
Set Up the Scene:
- Lie down on your left side, legs neatly stacked, and rest your head on your left arm.
- Place your right hand on your hip for added support and stability.
-
Form Check:
- Bend your hips and knees to create a perfect 90-degree angle. Your feet should align with your butt.
-
Activate the Core:
- Engage your core like a superhero gearing up for action. This will help with stability and control.
-
Lift Off:
- Channel your inner strength and lift your right knee as high as you can. Keep those feet together!
- Make sure your left knee stays in contact with the floor, and your hips remain stacked. No cheating by rotating those hips back.
-
Hold the Squeeze:
- At the peak, hold the position for a few glorious seconds. Feel the burn and embrace the challenge.
-
Lower with Control:
- Slowly and with control, lower your right leg back to the starting position.
-
Rep It Out:
- Aim for 3 sets of 15 repetitions on your left side.
-
Switch Sides:
- Time to even things out! Flip over and repeat the entire sequence on your right side.
This side-lying leg lift is your secret weapon for sculpting toned thighs and firm glutes. Get ready to feel the burn and celebrate those gains! 🏋️♂️🔥 #LegDayIntensity #SculptAndLift
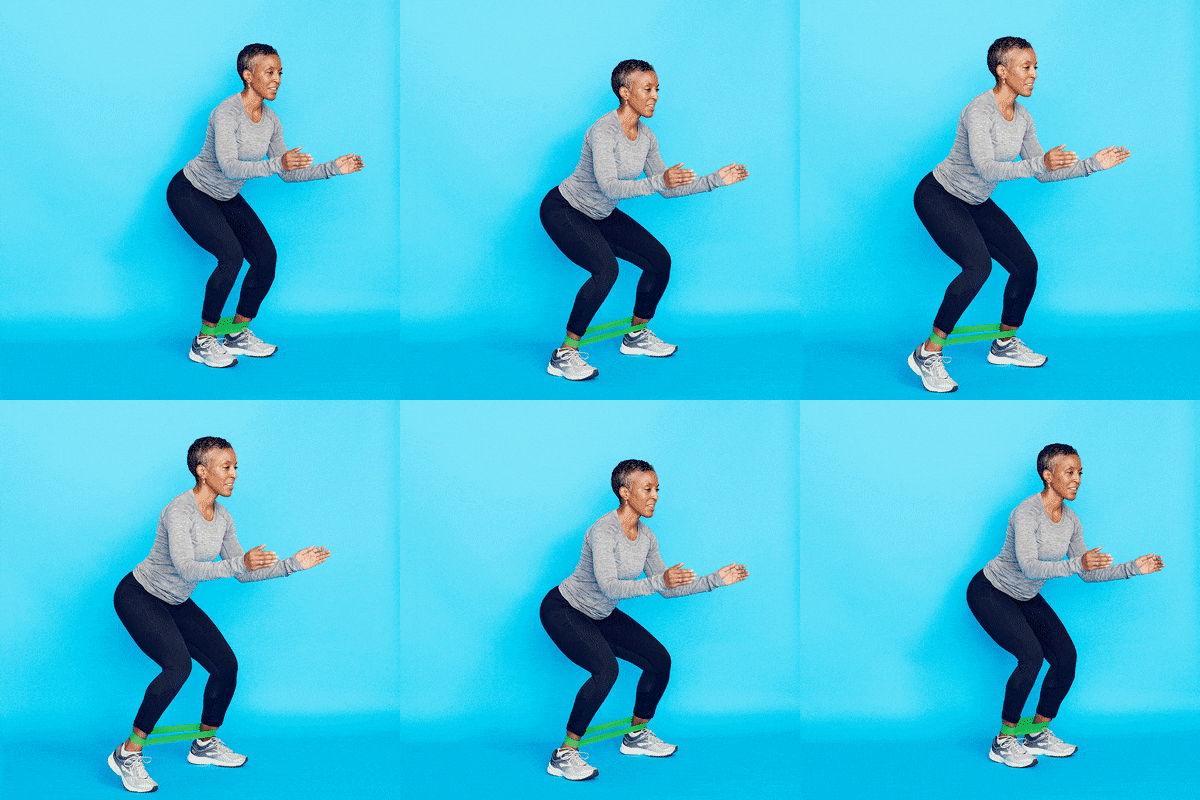
Get ready to set those glutes on fire with the banded side step exercise! This move targets your glutes and hip muscles, and for an extra burn, pair it up with other lower body exercises like squats or lunges. Let's dive into the details:
-
Set Up Your Band:
- Begin by standing with your feet shoulder-width apart, ready to conquer this booty-burning exercise.
- Place a resistance band either below your knees or around your ankles. Feel the resistance engaging the outer part of your legs and those glutes.
-
Quarter Booty Lower:
- Bend your knees and lower your booty about a quarter of the way. Get ready to feel the burn!
-
Step to the Right:
- Take a step to the right with your right foot. As you do this, allow the tension to release from the band.
- Return to the center with control. Your glutes should be singing by now!
-
Repeat the Side Steps:
- Keep the momentum going! Complete 10 side steps to the right, ensuring you maintain tension on the band.
-
Switch It Up:
- Time to give the left side some love. Repeat the side steps, this time to the left.
-
Sets and Reps:
- Aim for 3 sets on each side. Embrace the burn and feel those glutes working hard.
-
Bonus Move: Donkey Kicks
- Don't forget to add some spice to your routine with donkey kicks. Kick it back and feel the burn in those glutes!
Whether you're a beginner or a fitness pro, the banded side step is a killer move to sculpt and tone your lower body. Get ready to unleash the burn! 🍑💪 #GluteGains #BootyBurn
Donkey kicks are your secret weapon for targeting and firming those glutes. Here's how to perfect this booty-boosting move:
-
Position Yourself:
- Get on all fours with your knees hip-width apart, hands flat on the floor under your shoulders, and your spine in a neutral position.
-
Lift and Squeeze:
- Brace your core, then lift your right leg off the floor, keeping the knee bent and the foot flat.
- Engage your glute muscles to push your foot toward the ceiling. Squeeze at the top for maximum impact.
- Ensure your pelvis and hips remain pointed toward the ground throughout the movement.
-
Return with Control:
- Gently lower your right leg back to the starting position.
-
Repeat on Both Sides:
- Complete 15 reps on each leg for a total of 3 sets. Feel the burn and embrace the challenge!
Want to Take it Up a Notch?
-
Consider training with weights. Ankle weights for donkey kicks or dumbbells for lunges can intensify your workout and push you beyond a plateau.
-
Use various weights like dumbbells, resistance bands, or kettlebells to add resistance and make your exercises even more effective. If you're unsure where to start, consult with a personal trainer or physical therapist.
Instant Boost with Shapewear:
- For an immediate perk-up, shapewear is your go-to. Designed to lift and enhance your natural curves, shapewear like Ningmi Butt Lifter Padded Shapewear or Buxbody Women’s Butt Lifter Underwear can provide that extra definition.
Exploring Cosmetic Options:
- If shapewear and exercises don't meet your goals, butt lifts or implants are elective cosmetic procedures you can consider. Butt implants involve surgical placement of silicone implants, while less invasive options like butt lifts or injectable implants use dermal fillers or fat transfer for added volume and shape.
The Bottom Line:
- Everyone's backside is unique, but if you're looking to enhance yours, a combination of targeted exercises, shapewear, and, if desired, cosmetic procedures can help you achieve your goals. Remember, patience is key, and consult with a certified personal trainer for tailored advice on shaping and firming your booty. 🍑💪 #BootyGoals #SculptAndDefine


